Image Map

Saturday 29 March 2014

Review | Collection Lasting Perfection Ultimate Wear Concealer

Collection Lasting Perfection Ultimate Wear Concealer Fair 1 Review Belle-amie UK Beauty Fashion Lifestyle Blog
Collection Lasting Perfection Ultimate Wear Concealer Fair 1 Review Doe Foot Applicator Belle-amie UK Beauty Fashion Lifestyle Blog
Collection Lasting Perfection Ultimate Wear Concealer Fair 1 Review Swatch Belle-amie UK Beauty Fashion Lifestyle Blog

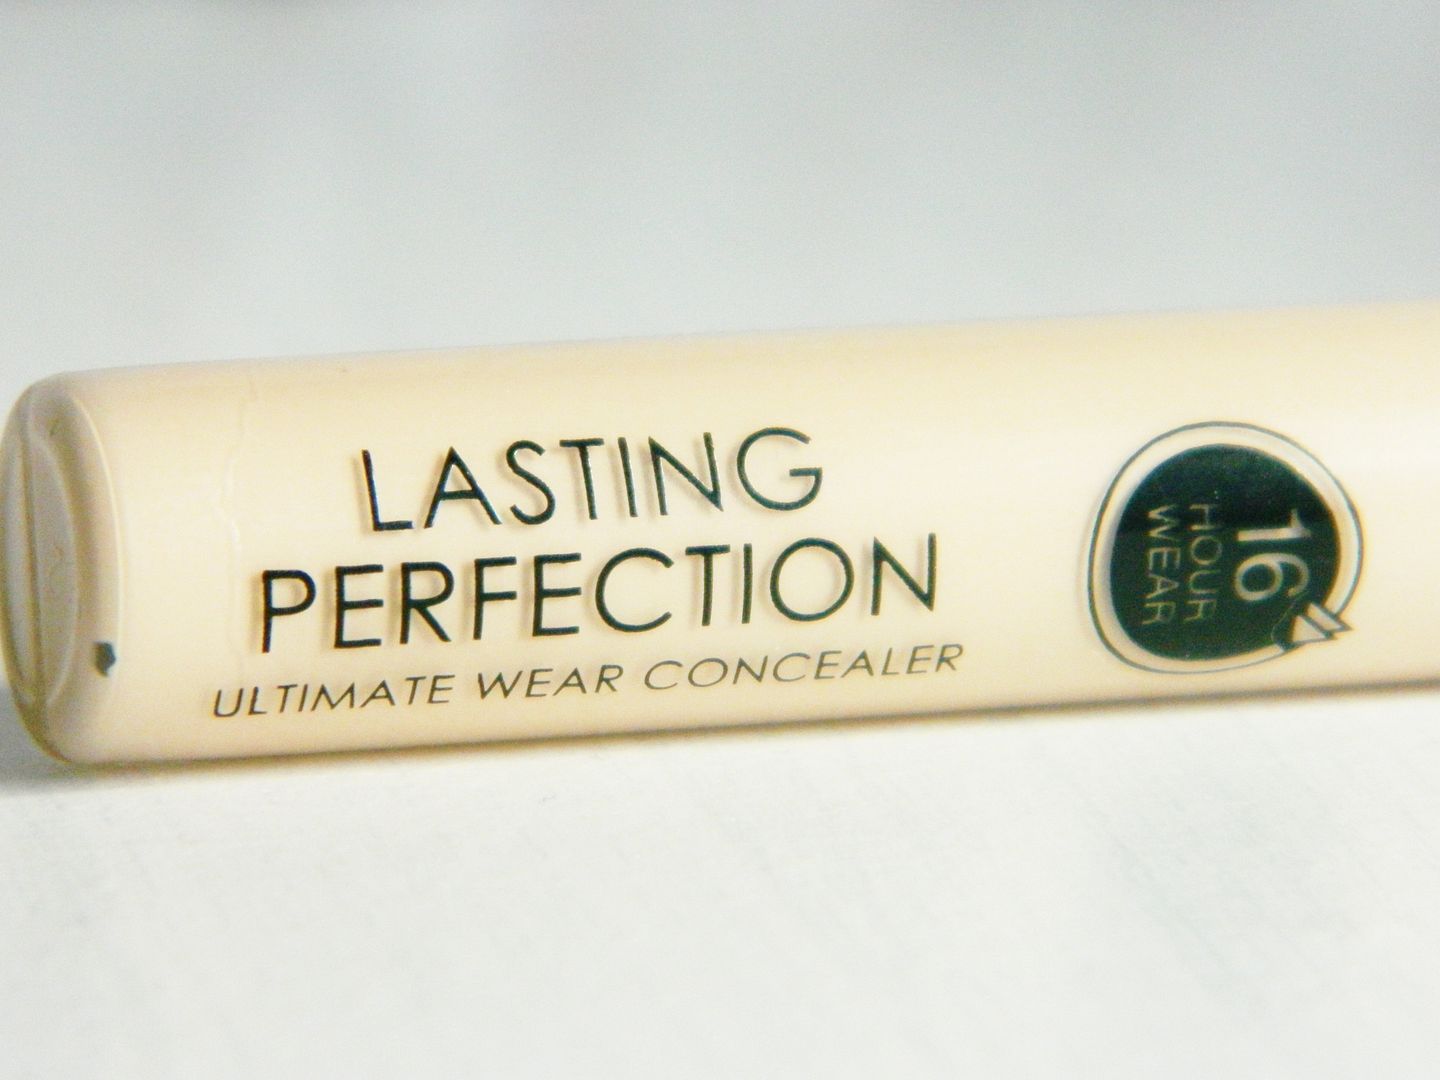
Hello everyone, I hope you're all having a lovely start to your weekend! I'm trying to get back into the swing of writing up some good old reviews of a few of my favourite makeup and beauty products. So I thought I would write one today about a makeup item that has been in my everyday routine for a very long time - even before I started blogging! The Collection Lasting Perfection Ultimate Wear concealer is a big hit amongst many bloggers mainly due to how cheap yet effective it is. After years of having this in my collection, I thought I would finally give you my thoughts and opinions on this wonderful product!

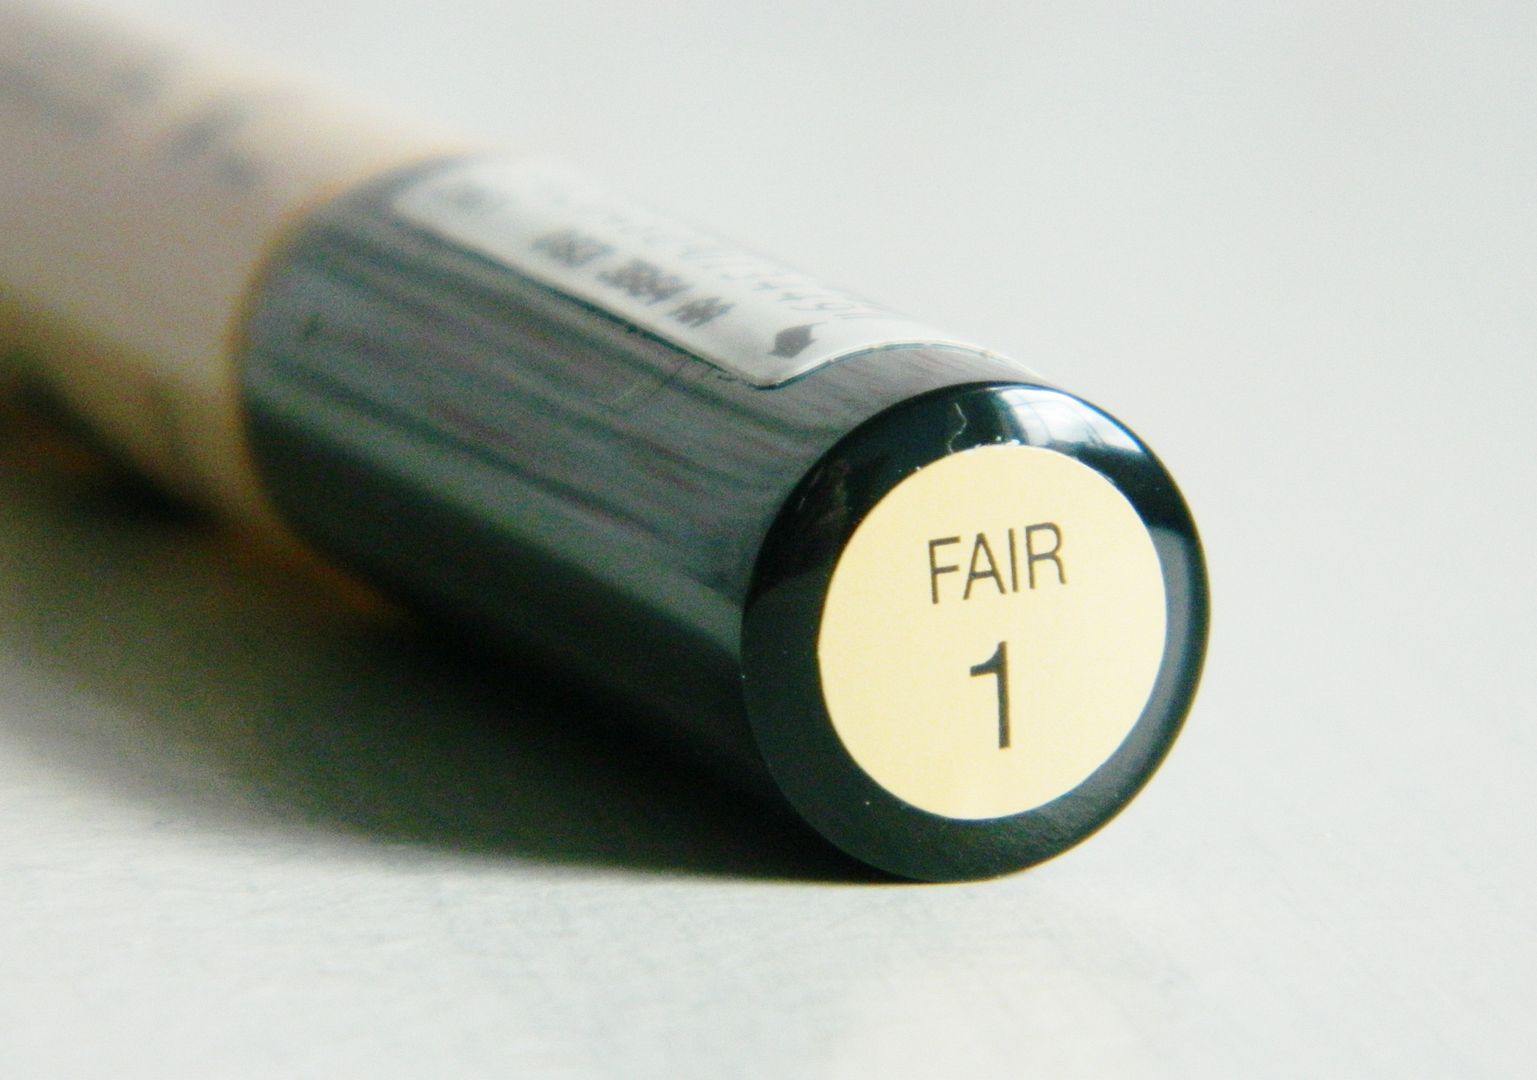
The Collection Lasting Perfection concealer comes in a small plastic tube similar to a lip gloss. It has a soft doe foot applicator which helps minimise wastage as you can apply (either directly to the skin or with your finger) as much or as little as you need for your skin. It's definitely not the most fancy packaging out there, but for just over £4 you are getting what you paid for! Collection offer 4 different shades of this concealer which are: Fair, Light, Medium and Deep however I've recently seen they are doing Cool and Warm versions of certain shades which allows this concealer to be used on a wider range of skin colours and tones. It has a very natural finish, not too matte or dewy, so it's great for all skin types too!

The shade I use is "Fair 1" which is the lightest shade available and personally I find that this matches my skin colour and tone perfectly. I used to use the next shade up, but after a while I realised it was much too dark and orange for my fair skin, so I decided to try out the lightest shade available. As it is quite a light shade, I find that this is a great concealer to use under the eyes as well as over blemishes as it can help illuminate and brighten the eye area. I like to use this concealer to cover any form of blemish on my skin from dark circles to spots and even redness. I find that it covers all of these problem areas up really well yet still leaves a natural looking finish. If my skin is quite dry however, I can find that if I apply too much of the Lasting Perfection concealer it can start to cling to the drier areas. The trick is just to apply a small amount to a dry area and blend it into the skin with your fingers as the warmth from them will help melt the concealer into your skin!

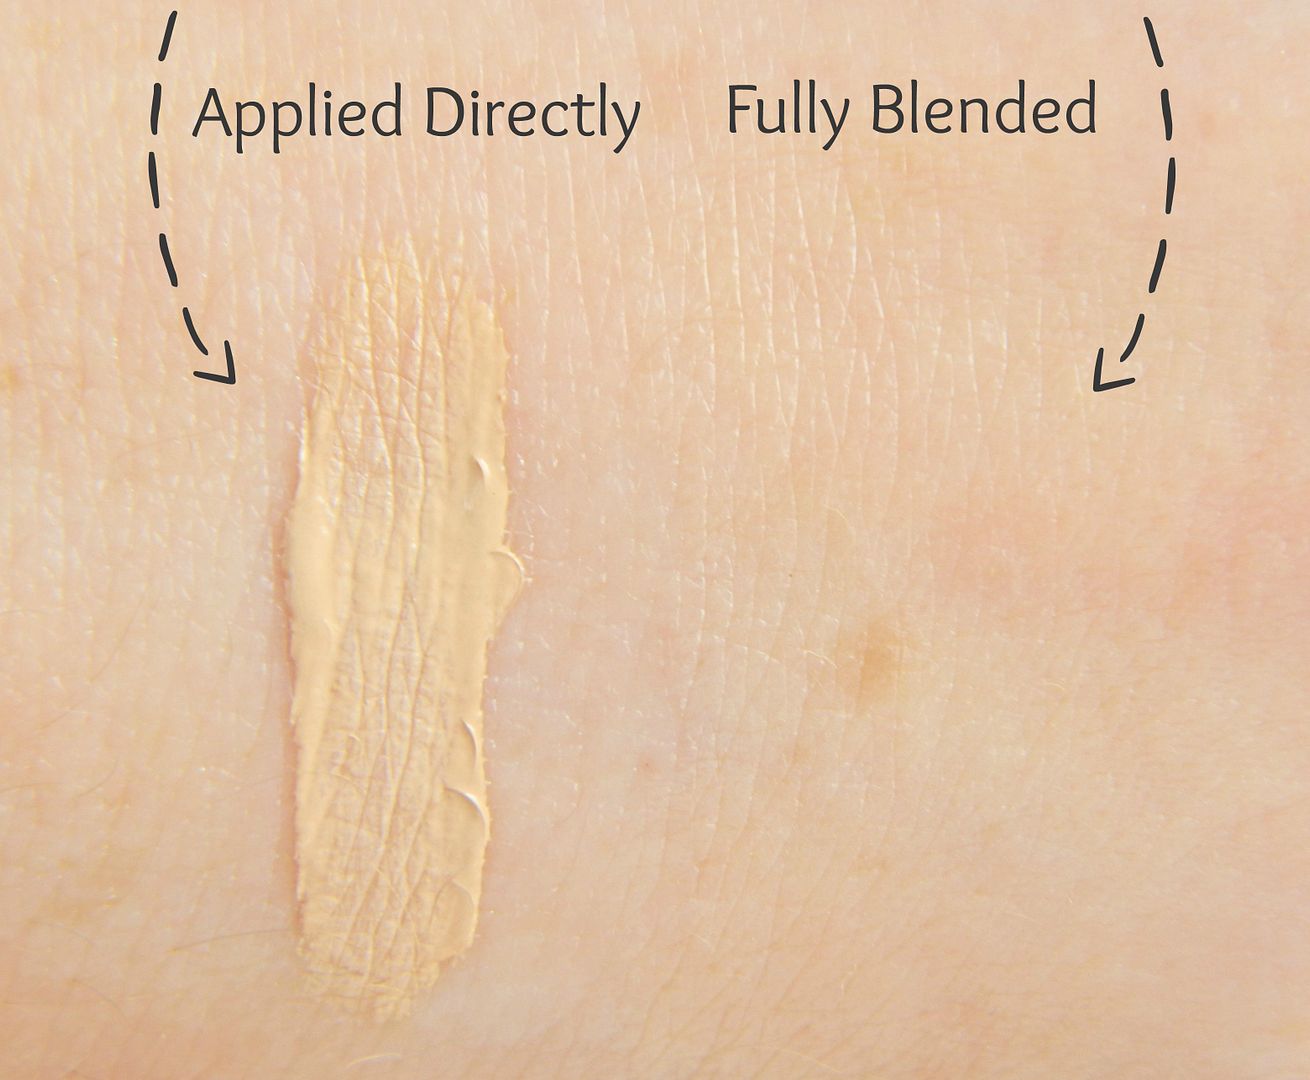
As for the overall formula of the Lasting Perfection concealer, it has a fairly thick consistency yet is really easy to blend into the skin. It offers medium to almost full coverage yet if you just apply a small amount, you can easily get away with a very natural yet flawless looking complexion. If I'm having a good skin day then I will usually just apply a small amount just to even out my skin slightly then pop some powder on over the top and I'm good to go! I will also use this concealer on a night out when I want that fuller coverage, so this shows that the Lasting Perfection concealer is very versatile and can be used in any kind of makeup look! In terms of how long this concealer lasts on your skin, I find that I very rarely have to touch up my makeup throughout the day (only if it's very hot)! I don't often wear my makeup for 16 hours so I don't know if Collection's "16 hour wear" claim is true, but I can say that the concealer does last until I take it off at night which is good enough for me!

Overall this is a fantastic makeup item to have in your collection. It's definitely not the most luxurious product out there but it does a really good job of covering up blemishes - for £4.19 you really can't go wrong! I think this concealer would be perfect for people who are starting out and experimenting with their makeup as it's so affordable and effective.

Have you tried the Collection Lasting Perfection concealer?
What is your favourite high street concealer?
Belle-amie UK Beauty Fashion Lifestyle Blog
 Bloglovin'  |  Twitter  |  Instagram  |  Facebook YouTube

My exclusive advertiser of the month is Daniela Scribbles. To find out how you can advertise with me, click HERE.

Tuesday 25 March 2014

How To | At Home Gel Manicure


Today I have a bit of a different post for you all which is about creating the perfect gel manicure in the comfort of your own home. Being a beauty student as well as a blogger, I've really taken an interest in the whole gel nails concept. For those of you know don't know, gel nail polishes are completely different to your normal everyday nail polish. They require either a UV or LED lamp to cure the polish in order for it to dry and because of this, they can typically last much longer than normal nail polish (anything from 2 to 4 weeks).

When I was contacted by the lovely people from Gelicious, I was extremely excited to finally have a go at creating my own gel manicures. Gelicious is an Australian based gel polish company that are now branching out into other areas of the world including the UK. They sent me the perfect starting kit for gel manicures which included: a travel size UV/ LED lamp, a gel polish in Little Prince George and an Ultra Glaze Top Coat.
I'm by no means an expert, but I've put together a little step-by-step post as to how I have been performing my manicures, so hopefully you'll find this both useful and interesting!

What You Need For A Gel Manicure

| What you will need for your gel manicure |
A UV or LED lamp
A coloured polish of your choice
A top coat (a base coat is optional for Gelicious polishes)
An acetone based nail polish remover (or a gel polish primer)
An acetone-free nail polish remover (or a gel polish cleanser)
A nail file and buffer
Cotton wool
Nail and cuticle oil
Gelicious Little Prince George Ultra Glaze Top Coat Review
 Little Prince George* | £25.32 - currently £17.28 | Ultra Glaze Top Coat* | £24.30 - currently £15.66 |

The gel nail polish colour I was sent to try out was Little Prince George. This shade was inspired by the famous dress that Kate Middleton wore when her and William revealed their baby boy to the world (click here to see some images of the dress)! What Gelicious have created is a beautiful baby blue shade that has little white polka dots in to create the same effect as the dress - very clever and well thought out if you ask me! This is a pretty shade that is perfect for the Spring time as pastel/ light shades are always on trend at this time of year! Both Little Prince George and the Ultra Glaze Top Coat also have a brand new formula that allows them to be cured in just 30 seconds which is incredibly fast.

Preparing Nails For Gel Manicure

Step 1 | Start your manicure by preparing your nails. Wash your hands with a moisturiser free hand wash to remove any oils from the nails as these can cause the polish to peel away. File and shape your nails and then buff them to remove the shine. If you want to make sure your nails are completely oil free, wipe over them with an acetone based nail polish remover or a gel polish primer. You can also apply a gel polish base coat at this step, but this isn't necessary with Gelicious polishes!

Top Tip | Prepare each of your hands separately. Once you have finished your first hand's polish, repeat Step 1 to the other hand so that you know there is absolutely no oil on your nails!

First Coat Of Gelicious Gel Polish
First Cure Of Gel Polish Gelicious Travel LED UV Lamp

Step 2 | Once your nails are prepared, you can start by applying your first coat of gel polish to your finger nails, you will do the thumb separately. This first coat has to be very thin and make sure you concentrate more on a clean finish rather than it being opaque. To remove any excess polish, simply wipe the brush against the neck of the bottle until almost all of the the polish is off. As you can see the polish is quite streaky when you first apply it, but the Gelicious polish does level out slightly once you apply the next coat!

Top Tip | Focus on creating that clean edge by avoiding the skin around the nail when doing your first coat. This will also help reduce your nail polish from peeling a day or two after your manicure!

Step 3 | Now you're ready to cure the polish on your finger nails! The Gelicious Travel Lamp is extremely easy to use. You literally plug it in at the mains (it is available with a UK plug), switch it on and then go! As the Travel Lamp contains both UV and LED rays, this means it's much quicker to cure polish compared to normal UV lamps. Unfortunately it doesn't come with a built in timer, but this isn't a problem for me as I can simply use my phone's countdown app so I know I've cured my polish for the correct time. Like I said Little Prince George cures in just 30 seconds which is really fast, convenient and quite simply amazing compared to other brands!

First Thumb Nail Coat Of Gelicious Gel Polish
Curing the Thumb For Gelicious Gel Nail Polish

Step 4 | Now you can start to paint your thumb nail. As you can't fit all of your fingers and thumb into this lamp at once (which is pretty standard across many gel lamps) you do have to paint your thumb separately. Again, you need to apply a very thin coat of polish to your nail making sure it doesn't come into contact with the surrounding skin.

Step 5 | Once your thumb is painted you can start to cure it. It is a little tricky to position your hand when curing your thumb (hence this awkward arm in the photo above haha) but as the lamp is extremely light, you can simply hold it up off the table to cure your thumb. Once all of your nails have been cured you may notice that they are still sticky - your nails have cured but the polish does stay tacky so that the next layer can adhere to it. I wouldn't recommend touching this layer as I do find it can still slightly smudge or ruin the overall effect of your gel nails!

Second Gel Polish Coat Gelicious Review

Step 6 | As gel polish isn't like normal nail polish, you can apply as many coats as you like (as long as they are thin and cured correctly) and it shouldn't peel off! Gelicious say that as this shade is quite light, I would need to apply around 3 or 4 for a more opaque look. This doesn't really bother me as I can understand that a paler shader will need that extra coat or two to make the colour pop! For this post I applied 3 coats of Little Prince George but I probably could have done with that 4th coat!

Top Tip | Apply polish to the tips of your nails to completely encase your nail. This will help reduce your polish from chipping and will help your manicure last much longer!

Gelicious Ultra Glaze Top Coat Application

Step 7 | Once you are happy with the colour finish of your nails, simply apply a thin coat of your top coat. The Gelicious Ultra Glaze Top Coat is designed to give your nails a glossy finish that will last you for a couple of weeks. Make sure that you apply the top coat to the tips of your nails as well as this will help your manicure last much longer! Again, cure your top coat polish and repeat on your thumb nail.

How To Remove The Sticky Layer From Gel Polish

Step 8 | The final step is to remove that tacky finish that your nails will have. With an acetone-free nail polish remover and a cotton pad, wipe over your nails until the stickiness has disappeared. Gelicious say to do this step with acetone, but I prefer using an acetone-free remover as I know this will not affect the look of my manicure. Once you're done you will have a beautiful looking manicure with 100% dry nails - this is the best perk about gels as there isn't any drying time apart from the curing!

Top Tip | Apply some nail and cuticle oil to restore the oils back into your nails. This will help soften your skin back up and nourish your dry nails.

Gel Polish Removal | To remove your gel manicure, simply pour some pure acetone into a bowl and soak your fingers for 10 minutes. Once soaked, you can use a cuticle pusher to peel off the gel polish. I really wouldn't recommend peeling your polish off dry nails as this will damage the top layer of your nails causing them to be weak and flaky!

Gelicious Little Prince George Ultra Glaze Top Coat Finish Swatch

So here is the final look! I absolutely adore the colour of this polish and love that it's a bit different to any gel polish I've seen before as it does contain little white polka dots. As you can probably see the polish is much thinner at the base of my nails compared to the top. This is probably due to my application techniques, but you know what they say, practice makes perfect!

I personally find that my Gelicious gel manicure will last me between 1 and 2 weeks, depending on what I've been putting my hands through. Things like typing can weaken down your polish, so as a blogger there's always the chance that this can affect my gel polish - however Gelicious gel nails are really easy to restore. If you find a nail has chipped you can simply paint over that area and cure it to make your manicure look perfect again!
I am really happy with my Gelicious products and I think they quality is great for the price! I would definitely consider trying out some more of their polishes, I think Electric Melon will look amazing in the Summer!

Thank you for reading today's post and I really hope that you enjoyed it! If you have any questions about gel polishes do let me know in the comments below and I will try to give you the best answer I can!

Have you ever tried applying gel polish at home?
Leave your gel polish tips and tricks in the comments below!
Belle-amie UK Beauty Fashion Lifestyle Blog
 Bloglovin'  |  Twitter  |  Instagram  |  Facebook YouTube

My exclusive advertiser of the month is Daniela Scribbles. To find out how you can advertise with me, click HERE.

Saturday 22 March 2014

Rimmel Foundation | Wake Me Up vs Match Perfection

Rimmel Wake Me Up VS Match Perfection Foundation Belle-amie UK Beauty Fashion Lifestyle Blog
Rimmel Wake Me Up VS Match Perfection Foundation Close Up Belle-amie UK Beauty Fashion Lifestyle Blog
Rimmel Wake Me Up VS Match Perfection Foundation Differences Belle-amie UK Beauty Fashion Lifestyle Blog
Rimmel Wake Me Up VS Match Perfection Foundation Pump Dispenser Belle-amie UK Beauty Fashion Lifestyle Blog
Rimmel Wake Me Up VS Match Perfection Foundation 100 Ivory Swatch Belle-amie UK Beauty Fashion Lifestyle Blog

Hello everyone! Today I thought I would make a post comparing two foundations that are very popular amongst many bloggers. Rimmel are well known for bringing out some amazing makeup products and their foundations are no exception. The Wake Me Up and Match Perfection foundations seem to be a hit with many bloggers so of course I have to jump on the band-waggon and try them both out! The first one I tried was the Wake Me Up foundation and that has been a staple in my makeup routine for around 2 years now. I recently picked up the Match Perfection to see how it compared to it's sister foundation and after a few weeks of testing, I'm ready to give my views on both!

Similarities of both Wake Me Up & Match Perfection
Both of these foundations are in the shade 100 Ivory which I believe are the lightest shades available. They both contain 30ml of product so, in terms of value for money, the Match Perfection works out much cheaper! They also come in glass bottles with a pump dispenser which makes them really easy to use and feel a lot more expensive then they are. As for coverage, both Wake Me Up and Match Perfection offer a light to medium coverage that is easily buildable. I wouldn't recommend these foundations if you were looking for a full coverage foundation as these are designed to look light and natural on the skin. Finally both of these foundations contain SPF (15 for Wake Me Up and 18 for Match Perfection) which means they're perfect for protecting your skin from UV rays all year round!

Rimmel Wake Me Up Foundation | £8.99 | LINK
Starting with the foundation I've been using the longest, Wake Me Up is designed to literally wake up your skin by giving it an anti-fatigue effect. It contains lots of little shimmers in which give your skin a healthy looking glow and a dewy complexion. Sometimes I find that if I apply too much of this foundation, it can leave a sheen on my skin which isn't too flattering. It can be mattified slightly by applying face powder but for people with oily skins, this foundation could well be your worst nightmare purely because of how dewy the finish is. But if you're like me and you have relatively dry skin, this helps add that healthy, dewy look back into the dull looking skin we have!

I find that the colour range of the Wake Me Up foundation is quite dark and as you can see from the swatch, when it's applied directly on to the skin it can look a little orange. However once it's blended out, I find this gives my skin a much needed hint of colour (something that I lack as a pale skinned girl) without looking orange. In the Summer this hint of colour looks great as my skin a slightly more tanned, but in the Winter when I'm a bit paler it can look ever so slightly miss-matched!

In terms of the Wake Me Up's formula, I find this has a slightly thick formula yet it blends out beautifully into the skin with my Real Techniques Buffing brush. It lasts all day on the skin with a primer underneath and I rarely have to touch it back up throughout the day (only if it's a very warm Summer's day!). The Wake Me Up foundation also has a very fresh smell to it which I really like but if you're not a fan of fragranced face products, you might not be so keen!

Rimmel Match Perfection Foundation | £6.99 | LINK
The Match Perfection foundation is a new edition to my makeup collection, but still one I've been enjoying using! This foundation is designed to blend into your skin seamlessly to give you a naturally flawless look. There is no shimmer what so ever in this foundation, yet it still gives you that subtle dewy finish that I really love! As this dewiness is easily covered up with powder (much easier than the Wake Me Up) I think that people with slightly oily or combination skin will be able to use this if they want to achieve a natural look.

The colour range of the Match Perfection foundations is a bit better than Wake Me Up's line. This version of 100 Ivory is a lot lighter than the Wake Me Up's version, so this is perfect for girls who are very pale and need a cheap yet effective foundation. I find that this foundation shade blends into my natural skin colour perfectly and I can keep on building up the coverage without it going orange or cakey looking. For me this makes it a perfect every day foundation that you can apply with little effort and just walk out the door!

You can see from the swatch that the Match Perfection foundation is a lot thinner than the Wake Me Up. It's probably one of the runniest foundations I've tried yet I don't have any problem with applying and blending it into my skin (again, with the Real Techniques Buffing brush). This foundation does last most of the day but I do find that because it's much thinner, I do need a little touch up towards the end of the day. This isn't something that bothers me, but I know that some people like their makeup to stay put all day! Again, Match Perfection has the same fresh scent as Wake Me Up, but I personally don't find it as strong.

Overall, right now I think I'm swaying more towards the Match Perfection foundation. After using Wake Me Up for a couple of years I like having something different to work with. I still think Wake Me Up is an amazing foundation and I'm sure I'll start using it again in the warmer months. If you're trying to decide which of these two to buy, I really hope that my opinions have helped!

Have you tried either Wake Me Up or Match Perfection foundation?
Which one do you prefer?
Belle-amie UK Beauty Fashion Lifestyle Blog
 Bloglovin'  |  Twitter  |  Instagram  |  Facebook YouTube

My exclusive advertiser of the month is Daniela Scribbles. To find out how you can advertise with me, click HERE.

Saturday 15 March 2014

Collective Beauty & Makeup Haul

Collective Beauty And Makeup Haul Spring 2014 Belle-amie UK Beauty Fashion Lifestyle Blog

Hello lovelies! Recently I've been treating myself to a lot of retail therapy and over the past few weeks I've accumulated a pretty large haul that I thought I would share with you all. There have been quite a few products on my wish list as I've felt that my beauty and makeup collection needed a bit of an update! With the "help" from Boots' 3 for 2 offer on pretty much everything beauty related, I was able to pick up a few bargains as well as some naughty impulse purchases from the beauty counters!

Collective Beauty And Makeup Haul Spring 2014 Urban Decay Naked 3 Topshop Nail Polish Rimmel Match Perfection Foundation Belle-amie UK Beauty Fashion Lifestyle Blog

Urban Decay Naked 3 Palette | £37.00 | LINK
One of the first makeup items I picked up was actually the one I had been lusting after the most and it's of course the beautiful Urban Decay Naked 3 palette. After weeks of umming and ahhing at the Urban Decay counter, I finally took the plunge and added this gorgeous rose gold palette to my collection. So far I have been enjoying it, but I do find it's a bit harder to work with compared to the original Naked palette. The colours and packaging are beautiful but I do think I need to have a proper play around with this palette to find some eye looks that I like.

Topshop Nails Nail Polish | £5.00 reduced to £1.00 each | LINK
I've never been one to buy many of Topshop's nail polishes. I absolutely adore their lipsticks and cream blushers, but never really went for their nail varnishes. The other day I spotted they had a basket full of polishes for just £1 each in their sale, so I decided to pick up these 3 very pretty shades: Twilight Tease, Tingle and Suffuse. Twilight Tease and Suffuse are both metallic finish polishes that are opaque in 1 coat and look lovely on the nails! Tingle is a sheer pink polish with lots of silver glitter in it and looks amazing over the top of Suffuse! My opinion on Topshop's polishes has definitely changed since trying these shades, so I'll definitely be trying some more in the future!

Rimmel Match Perfection Foundation in 100 Ivory | £6.99 reduced to £5.00 | LINK
I finally picked up a new foundation. For me this is really rare as I usually tend to stick to 1 foundation for 2 or 3 years! After really enjoying Rimmel's Wake Me Up foundation, I thought I would try their sister version that contains not shimmer. The glow you get from Wake Me Up is lovely, but some days I would much prefer to have a less dewy looking face. I've been using this for almost a week now and I absolutely love it! The coverage and formula are great, perfect for the skin look I like to go for!

Collective Beauty And Makeup Haul Spring 2014 Soap And Glory Feel Good factor Archery Lid Stuff Gloss Stick Belle-amie UK Beauty Fashion Lifestyle Blog
Collective Beauty And Makeup Haul Spring 2014 Soap And Glory Lid Stuff Whats Nude Gloss Stick Fuchsia-Ristic Archery Brownie Points Feel Good Factor Tube Belle-amie UK Beauty Fashion Lifestyle Blog

Soap & Glory Archery in Brownie Points | £10.00 | LINK
 After spending almost a year using a random Benefit eye shadow to fill in my brows, I thought I would try something completely different. I'd heard that Soap & Glory's Archery was a really quick and effective product to use to fill in brows. It has 2 sides: a thin brush end that you can use to tint your brows and the other side is a brow pencil. I've been really enjoying the tinting side as it leaves my brows looking defined yet still natural looking!

Soap & Glory Feel Good Factor* | £12.00 | LINK
I actually was sent Feel Good Factor by the lovely girls from Soap & Glory and I thought I would pop it in this haul to give you a brief overview of the product plus my initial thoughts! This is a translucent BB cream that you apply before your makeup to help moisturise, prime and protect your skin from the sun's UV rays - a great multi-purpose product! So far I've found this leaves my skin feeling really soft and helps my makeup stay put pretty much all day, even whilst I'm at work! I'm really enjoying this product so far, it's a great added step in my face routine to help improve my skin. I will be posting a review of Feel Good Factor on my blog soon, so if you want to read more then do keep your eyes peeled!

Soap & Glory Lid Stuff in What's Nude | £10.00 | LINK
I've seen so many bloggers raving about this little eye shadow quad and with every post or video I saw, I wanted it even more! What's Nude contains 3 matte and 1 shimmer shadows which are all great everyday shades. I haven't actually tried the shadows yet but I'm planning to include Lid Stuff in a few upcoming posts so I will update you all on it then!

Soap & Glory Sexy Mother Pucker Gloss Stick in Fuchsia-Ristic | £8.00 | LINK
After receiving a Gloss Stick at Christmas in Nudist, I knew I had to add more of these lip crayons to my collection! I'm already a sucker for lip crayons and personally, I think Soap & Glory's has one of the best formulas on the high street! Fuchsia-Ristic is a bright coral shade that leaves a really pretty wash of colour on the lips. My favourite thing about these lip crayons is the scent, it's blooming lovely - plus they have a really moisturising formula which leave my lips feeling very soft.

Collective Beauty And Makeup Haul Spring 2014 Aussie Miracle Moist Shampoo Conditioner 3 Minute Miracle Reconstructor Belle-amie UK Beauty Fashion Lifestyle Blog

Aussie Miracle Moist Shampoo & Conditioner | £5.99 each | LINK
Recently my hair has become very frizzy and "fluffy" looking due to all of my little baby hairs starting to grow through - grr! I thought I would swap up my shampoo and conditioner to something a lot more hydrating to help smooth my hair back down. I opted for Aussie's Miracle Moist duo as I knew that they would really help moisturise my hair, and so far they have! My hair is a lot more manageable since using these together plus my curls have become a lot more defined. As always, these Aussie product also leave my hair smelling gorgeous so it's a win-win situation!

Aussie 3 Minute Miracle Reconstructor Deep Conditioner | £4.99 | LINK
For an extra boost of hydration (and because it was free in the Boots 3 for 2 deal!) I also picked up the 3 Minute Miracle Reconstructor. I've seen this featured on Anna's channel quite a lot saying how well it conditions her hair, so I thought I would try it out as well! I really love this product, again it smells amazing and it does leave my hair feeling so much stronger and nourished! A big thank you Aussie for saving my hair!

Collective Beauty And Makeup Haul Spring 2014 Superdrug Vitamin E Eye Cream Super Balm Lush Fluffy Egg Balistic Rose Bubble Bar Belle-amie UK Beauty Fashion Lifestyle Blog

Superdrug Vitamin E Radiance Eye Cream | £2.99 | LINK
I've always suffered with dry eye lids and I've never really found an eye cream that actually helps clear this problem up. I love the Superdrug Vitamin E range so I decided to pick up their eye cream on a whim and see whether or not this could help cure my dry eye lids. This eye cream is quite temperamental. You have to use the right amount and pat it into your eyes otherwise it will go all funny and leave white bits round your eyes - not a pretty look! But, if you do use this cream correctly it leaves your eyes feeling really soft and over the past few weeks it's actually cleared up my dry skin problem! I am impressed with this eye cream and even though you do have to work with it in a particular way, it's well worth it!

Superdrug Vitamin E Super Balm | £3.99 | LINK
At the same time I picked up a new product in the Vitamin E line called Super Balm. This is a multi-purpose product that can be used on your lips, nails, cuticles and dry areas on your body. As I have been trying out gel polishes recently, I thought this would be a great product to put oils back into my nails which can be lost with the use of acetone and primers. It has a really smooth formula and leaves your nails feeling nourished and cuticles feeling soft! Definitely a great little product to have in your nail bag!

Lush Fluffy Egg Bath Bomb | £2.95 | LINK
Finally I picked up a couple new products from Lush (even thought I still have a few left from Christmas!). The Fluffy Egg bath bomb is a large pink egg with little flowers in and smells just like Snow Fairy. This will leave your bath water smelling amazing and will definitely help people who are craving the Christmas favourite Snow Fairy products!

Lush Rose Bubble Bar | £2.95 | LINK
This is probably one of the prettiest bubble bars I've seen Lush do and it went straight into my little wicker basket! This little bubble bar smells very floral and soothing due to it containing rose oil, plus with the cocoa butter it will also help leave your skin feeling really soft! The Rose bubble bar is quite small, but I definitely think it's worth the money purely because of how lovely it looks! I'm really looking forward to my pamper bath times with my new Lush goodies!

So these are the latest beauty and makeup additions to my collection! I'm really happy with everything I've picked up recently and I can't wait to start creating lots of new looks with these products. I hope you enjoyed this haul and let me know if you've tried anything I've bought recently.

Have you bought any beauty or makeup products recently?
Please leave your haul links in the comments below!
Belle-amie UK Beauty Fashion Lifestyle Blog
 Bloglovin'  |  Twitter  |  Instagram  |  Facebook YouTube

My exclusive advertiser of the month is Daniela Scribbles. To find out how you can advertise with me, click HERE.

Wednesday 12 March 2014

Outfit Of The Night | Ellie Goulding Concert

Outfit Of The Night Ellie Goulding Monochrome Dress Belle-amie UK Beauty Fashion Lifestyle Blog
Outfit Of The Night Ellie Goulding Gold Statement Necklace Belle-amie UK Beauty Fashion Lifestyle Blog
Outfit Of The Night Ellie Goulding Black Primark Bag Belle-amie UK Beauty Fashion Lifestyle Blog
Monochrome Dress - New Look | Black Bag - Primark | Floral Bow - Topshop | Black Tights - Primark | Leather Jacket - Oasis
Black & Gold Detail Boots - New Look | Gold Statement Necklace - Oasis | Ring & Bracelet - Pandora

Hello everyone, I hope you're all having a lovely week! You may have read in my last post that last weekend me and my boyfriend took a trip up to the London O2 arena to see Ellie Goulding in concert! This was my very first trip to a proper concert because I've never really been a "music person" and tend to stick to my favourite artists, with Ellie being one of them. Knowing that she always puts on an amazing performance at her shows, I had to pick up a couple of tickets as soon as they went for sale! Today I thought I would share with you all what I wore this weekend plus I've included a few pictures from the night itself!

A couple days before the event, I picked up this beautiful monochrome dress in the New Look sale for just £10. I loved how perfectly it fitted and I always find the floaty, skater style dresses look flattering on my body shape. I also thought the print on the top half was very pretty and it's the sort of dress that can be easily dressed up or down depending on what accessories you pair with it. I decided to go for a gold statement necklace, some thick black tights and my trusty New Look boots! As we've been experiencing some sort of heatwave in England recently, this outfit wasn't all that comfortable during the day but once we actually got to the arena, it became much cooler. Paired with my leather jacket this is a great little outfit to wear during the miss-match weather of March!

Instagram amiehaffenden Belle-amie UK Beauty Fashion Lifestyle Blog

As for the night itself, we made sure we got to the O2 early so that my boyfriend could eat at one of his all time favourite restaurants, TGI Friday's! I went for the Jack Daniels chicken, chips and vegetables and it's safe to say we were both stuffed afterwards! Once we'd eaten we headed to the queue and filed ourselves into the arena and headed to our seats. I was so surprised at how good our seats actually were! We were on the front row of the seating area directly in front of the stage - this is great for short people like me as there was no annoying tall person standing in front haha! After a supporting act and a lot of waiting patiently, Ellie finally made it on to the stage and delivered an amazing performance! I enjoyed every minute of it (except when the people behind spilt a bit of wine on us!) and would definitely recommend everyone to go and see her in concert - she is just absolutely brilliant!

I hope you enjoyed today's more lifestyle sort of post! I would love to hear your thoughts on my outfit and do tell me what fashion trends you've been loving recently. Thank you for reading and I'll speak to you all very soon!

What are your thoughts on my outfit?
Have you been to see anyone in concert recently?
Belle-amie UK Beauty Fashion Lifestyle Blog

 Bloglovin'  |  Twitter  |  Instagram  |  Facebook YouTube

My exclusive advertiser of the month is Daniela Scribbles. To find out how you can advertise with me, click HERE.

Friday 7 March 2014

Spring Time Makeup Look | Topshop's Infrared

Spring-Time-Makeup-Look-Topshop-Infrared-Belle-Amie-UK-Beauty-Fashion-Lifestyle-Blog
Spring-Time-Makeup-Look-Topshop-Infrared-Benefit-Rimmel-Stila-Soap-And-Glory-Maybelline-Collection-Belle-Amie-UK-Beauty-Fashion-Lifestyle-Blog
Spring-Time-Makeup-Look-Applying-Topshop-Infrared-Lipstick-Belle-Amie-UK-Beauty-Fashion-Lifestyle-Blog

Hello lovelies and happy Friday to you all - I hope that you're all looking forward to your weekend! I'm definitely looking forward to mine because I'm finally going to see the amazing Ellie Goulding at the O2 in London on Sunday - eeek, I'm so excited! I absolutely love Ellie and this will be the first time seeing her performing live and I really can't wait. I've never actually been to a proper concert like this in an arena (shocking isn't it?) so I'm also pretty nervous as I don't really cope well in large crowds, especially in an enclosed space! Luckily we're not getting the train up there as I've seen the ridiculous queues/ crowds lining up for the station after the shows - it's mental and definitely not a situation I would enjoy...

For today's post I thought I would do a little Spring time makeup look focusing around one of my favourites lipstick shades (and colours in general) Topshop's Infrared. I love wearing a good bright orange lipstick in the Spring and Summer time, so now that the sun has finally got its hat back on, I'm fully embracing this sunny weather by wearing this lipstick on a daily basis. I guess you could call this my "everyday Spring makeup look" too as I have been wearing these products a lot recently since it's been all Summery outside!

Topshop's Infrared lipstick has a velvet finish which means it's mainly matte but with a slightly shiny effect. As it is a little matte it is important that you apply a lip balm before hand otherwise it will cling to any drier areas on your lips - not good! The colour pay off is amazing and looks so pretty on the lips. This isn't a lipstick for the faint hearted though as it is pretty bright and definitely takes a bit of getting used to. I however adore this lipstick and it's definitely on of my favourites for this time of year.

To match my lipstick I also applied Benefit's Coralista blusher to my cheeks as I think it ties the orange tones together really well. I love the slight sheen this blusher gives my skin and it makes it look dewy and healthy! I also applied a small amount of Benefit's Hoola bronzer to the contours of my cheeks and finished the look with a dusting of highlighter from the Sleek Face Form palette. These products together give a beautifully natural finish that I love wearing on a daily basis.

Finally for my eyes, I keep going back to one of my "safe" eye looks which is a shimmery golden shadow with a flick of liquid liner. As this is a pretty simple eye look, it does partner well with the bright orange lipstick. For the eye look I use Maybelline Colour Tattoo in On and On Bronze as a base and then apply Kitten and Bubbly from the Stila In The Light palette. The eye liner I've been using is Soap & Glory's Supercat Liner and is perfect for creating a slight winged effect. Together, they create such a simple look but it's one that never fails to look pretty for the day time.

So this is my Spring time makeup look that's perfect for everyday! My foundation base rarely changes and has been one I've used for a long time, but if you want to read more then do check out this post about my base makeup. I hope you enjoyed this post and hopefully you have found some new products to add to your Spring time makeup routine!

What are your go to makeup products for Spring?
Belle-amie UK Beauty Fashion Lifestyle Blog
 Bloglovin'  |  Twitter  |  Instagram  |  Facebook YouTube

My exclusive advertiser of the month is Daniela Scribbles. To find out how you can advertise with me, click HERE.

Tuesday 4 March 2014

Meet My March Advertisers

Meet-My-March-2014-Advertisers-Belle-Amie-UK-Beauty-Fashion-Lifestyle-Blog
Photo from weheartit.com and edit by myself
Hello everyone and welcome to my first post this month! Is anyone else really looking forward to the Spring time? I found this cute picture of a field of daisies on We Heart It and it instantly made me feel all Summery inside! I am definitely over wearing chunky knits and can't wait to swap them out for floral dresses, sandals and cute little Spring time clothes!

Today I will be sharing with you all the lovely people that are advertising with me this March. This month I have one exclusive advertiser who is Daniela from the blog Daniela Scribbles. She writes all about beauty products and also includes scribbles about her life which makes her blog very personal and unique. Daniela is a really lovely girl with a blog I'm sure you'll thoroughly enjoy reading!

Daniela Scribbles Blog

I post beauty reviews, hauls, DIY and recipes, along with any little randoms, little funnies, little interestings that have happened to make me smile that day. I like to scribble about what I like, and on occasions, what I don't like.

I like to put make up on my face, a good cup of tea and honest people.

I like reading, cooking and my two little furry friends.

I scribble as I think, no edits, no nothing, and I enjoy sharing my thoughts with others.

Happy reading! Daniela xo

Follow me on:
Blog | www.danielascribbles.blogspot.co.uk
Instagram | ddiraimo92
Pinterest | ddiraimo92 
Twitter | ddiraimo92 
Email | dannidiraimo@gmail.com

I hope that you do go and check out Daniela's blog and have a good browse through all her posts!

Be sure to check out Daniela's blog and let me know if you do in the comments below!
Belle-amie UK Beauty Fashion Lifestyle Blog
 Bloglovin'  |  Twitter  |  Instagram  |  Facebook YouTube

My exclusive advertiser of the month is Daniela Scribbles. To find out how you can advertise with me, click HERE.
Related Posts Plugin for WordPress, Blogger...